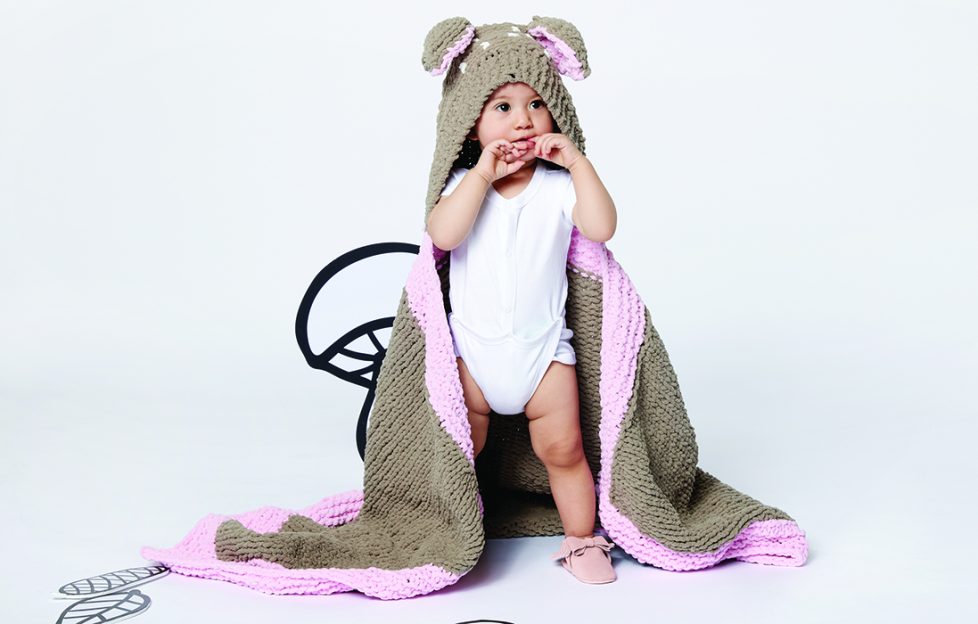
Knit this easy, super-soft hooded baby blanket for the little cherub in your life and watch as they snuggle in to their cosy cover made with love.
Baby blanket knitting pattern: Measurements
Approx 50″ x 30″ [127 x 76 cm], excluding hood.
Gauge
7½ sts and 16 rows = 4″ [10 cm] with larger needles in garter st.
8 sts and 13 rows = 4″ [10 cm] with larger needles in stocking st.
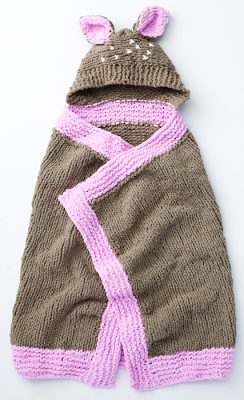 You will need:
- Bernat® Baby Blanket™ (3.5 oz/100 g; 72 yds/65m) Contrast A Sand Baby (03010) 6 balls or 432 yds/390 m
- Bernat® Baby Blanket™ (3.5 oz/100 g; 72 yds/65m) Contrast B Baby Pink (03200) 1 ball or 72 yds/65 m
- Size U.S. 10½ (6.5 mm) knitting needles
- Size U.S. 11 (8 mm) circular knitting needle 40″ [101.5 cm] long or size needed to obtain gauge
- St holder
- 5 yds [4.5 m] of Bernat® Baby Blanket™ Vanilla (03008), for embroidery.
The yarn for this project is available from woolwarehouse.co.uk and www.readicut.co.uk.
Knitting abbreviations
Alt = Alternate
Approx = Approximately
Beg = Begin(ning)
Dec = Decrease
K = Knit
K2(3)tog = Knit next 2(3) stitches together
Kfb = Increase 1 stitch by knitting into front and back of next stitch
M1 = Make 1 stitch by picking up horizontal loop lying before next stitch and knitting into back of loop.

P3tog = Purl next 3 stitches together
Rep = Repeat
RS = Right side
St(s) = Stitch(es)
Ssk = Slip next 2 stitches knitwise one at a time. Pass them back onto left-hand needle, then knit through back loops together
Tog = Together
WS = Wrong side
How to make the hooded baby blanket:
With larger circular needle and yarn B, cast on 84 sts. Do not join. Working back and forth across needle in rows, proceed as follows:
Knit 9 rows (garter st), noting 1st row is RS.
Next row: (WS). K6. *Kfb. K13. Rep from * to 8 sts. Kfb. K7. 90 sts.
Break B.
With yarn A and beg with a knit row, work in stocking st until blanket from beg measures approx 27½” [70 cm], ending on a RS row.
Next row: (WS). K6. *K2tog. K13. Rep from * to last 9 sts. K2tog. K7. 84 sts.
Break A.
With yarn B, knit 9 rows (garter st).
Next row: (WS). Cast off 29 sts. K26 and place on st holder for Hood. Cast off 29 sts.
To make the hood:
Slip 26 sts from st holder onto working needle.
1st row: (RS). K10. Kfb. K4. Kfb. K10. 28 sts.
2nd and alt rows: K5. Purl to last 5 sts. K5.
3rd row: K10. Kfb. K6. Kfb. K10. 30 sts.
5th row: K10. Kfb. K8. Kfb. K10. 32 sts.
7th row: K10. Kfb. K10. Kfb. K10. 34 sts.
9th row: K10. Kfb. K12. Kfb. K10. 36 sts.
10th row: K5. Purl to last 5 sts. K5.
11th row: Knit.
Rep last 2 rows until Hood measures approx 7″ [18 cm], ending on a WS row.
Dec as follows:
1st row: (RS). K10. K2tog. K12. K2tog. K10. 34 sts.
2nd and alt rows: K5. Purl to last 5 sts. K5.
3rd row: K10. K2tog. K10. K2tog. K10. 32 sts.
5th row: K10. K2tog. K8. K2tog. K10. 30 sts.
7th row: K10. K2tog. K6. K2tog. K10. 28 sts.
9th row: K10. K2tog. K4. K2tog. K10. 26 sts.
11th row: K10. K2tog. K2. K2tog. K10. 24 sts.
12th row: K5. Purl to last 5 sts. K5.
Do not cast off.
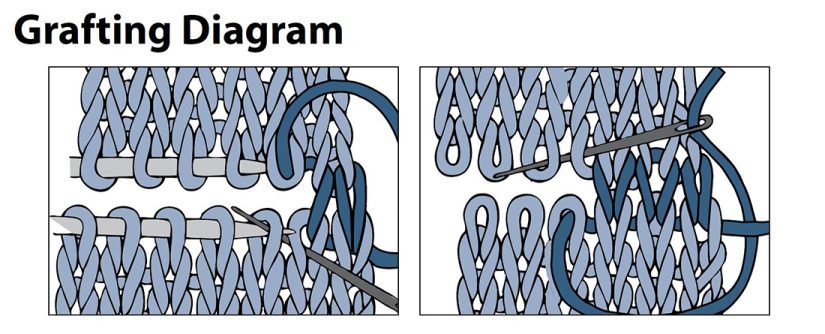
Fold last row of Hood in half. Graft 2 sets of 12 sts tog.
To make side borders:
With RS facing, larger circular needle and B, pick up and knit 56 sts evenly across left side of blanket.
Knit 9 rows (garter st). Cast off. Rep for right side of blanket.
To make ears:
Outer Ear (make 2)
With smaller needles and A, cast on 5 sts.
1st row: (RS). Knit.
2nd and alt rows: Purl.
3rd row: K1. M1. K3. M1. K1. 7 sts.
5th row: K1. M1. K5. M1. K1. 9 sts.
7th and 9th rows: Knit.
11th row: K1. ssk. K3. K2tog. K1. 7 sts.
13th row: K1. ssk. K1. K2tog. K1. 5 sts.
15th row: K1. K3tog. K1. 3 sts.
16th row: P3tog.
Inner ear (make 2)
With smaller needles and B, make as given for outer ear.
Sew inner ear to outer ear with WS facing each other. Sew ears to top of hood as seen in picture.
Finishing touches:
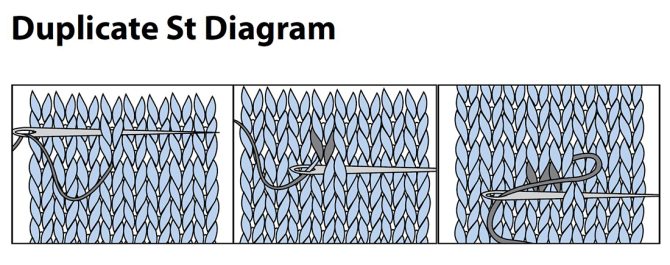
With Vanilla yarn, embroider spots on hood using duplicate st as shown in pictures and diagram below.
